Setting up and moving the camera
There will be two game objects that will be manipulated - a Camera Rig and the Main Camera:
- Within your scene, create an empty game object and name it CameraRig
- Make the Main Camera a child of the Camera Rig
- Create a new script called
CameraControllerand add it to the CameraRig game object
The purpose of the Camera Rig is to handle moving and rotating around the scene. Having it as a separate game object will let us move on the forward/right axis without having to worry about the forward direction the actual camera is pointing. The Main Camera will be configured on startup with the custom properties to ensure it’s focusing on the right point in world space. It will also handle zooming.
Since the camera will be configurable, we’ll first define the variables that can be set in the inspector:
public class CameraController : MonoBehaviour
{

    [Header("Configurable Properties")]
    [Tooltip("This is the Y offset of our focal point. 0 Means we're looking at the ground.")]
    public float LookOffset;
    [Tooltip("The angle that we want the camera to be at.")]
    public float CameraAngle;
    [Tooltip("The default amount the player is zoomed into the game world.")]
    public float DefaultZoom;
    [Tooltip("The most a player can zoom in to the game world.")]
    public float ZoomMax;
    [Tooltip("The furthest point a player can zoom back from the game world.")]
    public float ZoomMin;
    [Tooltip("How fast the camera rotates")]
    public float RotationSpeed;

}
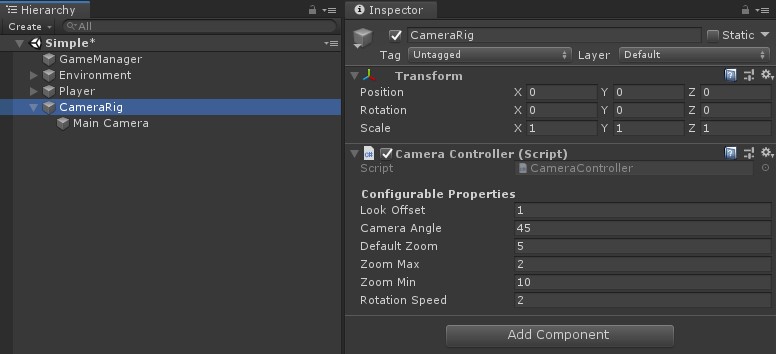
This tutorial will be setup with a 45-degree camera that is looking 1 meter above the ground. It’ll also restrict zooming to be within 2 - 10 meters. Here is the full set of properties to set within the inspector:

Next, configure the camera’s starting point based on the properties set. Add the following global variables to your script along with the Start() method:
    //Camera specific variables
    private Camera _actualCamera;
    private Vector3 _cameraPositionTarget;

    void Start()
    {
        //Store a reference to the camera rig
        _actualCamera = GetComponentInChildren<Camera>();

        //Set the rotation of the camera based on the CameraAngle property
        _actualCamera.transform.rotation = Quaternion.AngleAxis(CameraAngle, Vector3.right);

        //Set the position of the camera based on the look offset, angle and default zoom properties. This will make sure we're focusing on the right focal point.
        _cameraPositionTarget = (Vector3.up * LookOffset) + (Quaternion.AngleAxis(CameraAngle, Vector3.right) * Vector3.back) * DefaultZoom;
        _actualCamera.transform.position = _cameraPositionTarget;
    }
It is better to store reference to the main camera game object instead of calling Camera.main. Calling Camera.main directly can have a performance impact as Unity is not actually storing a reference to the main camera. Instead, each call traverses your scene hierarchy and components.
Adding movement behavior
Adding movement to your camera will need a few global variables, a call in LateUpdate() and a new OnMove() method:
    //Movement variables
    private const float InternalMoveTargetSpeed = 8;
    private const float InternalMoveSpeed = 4;
    private Vector3 _moveTarget;
    private Vector3 _moveDirection;

    /// <summary>
    /// Sets the direction of movement based on the input provided by the player
    /// </summary>
    public void OnMove(InputAction.CallbackContext context)
    {
        //Read the input value that is being sent by the Input System
        Vector2 value = context.ReadValue<Vector2>();

        //Store the value as a Vector3, making sure to move the Y input on the Z axis.
        _moveDirection = new Vector3(value.x, 0, value.y);

        //Increment the new move Target position of the camera
        _moveTarget += (transform.forward * _moveDirection.z + transform.right * _moveDirection.x) * Time.fixedDeltaTime * InternalMoveTargetSpeed;
    }

    private void LateUpdate()
    {
        //Lerp  the camera to a new move target position
        transform.position = Vector3.Lerp(transform.position, _moveTarget, Time.deltaTime * InternalMoveSpeed);
    }
OnMove(), stores the player input value by calling context.ReadValue<Vector2>(). Since we are using the Vector 2 composite binding, we will see the following x & y values depending on which input was pushed:
- Up: 0, 1
- Down: 0, -1
- Right: 1, 0
- Left: -1, 0